I am trying to edit account page to add a new tab but that was not successful. 

So I deleted the replacing object created for account section with replacing scheme.

Now the account section page opens perfectly fine when debug mode is off in console. But when I turn it on, it crashes the page and given me the following error.

Can someone please help me, why is there any error in first place only when I turn on debug mode in console?


Like 0

Like

2 comments

Hello Ramnath,


It is hard to say why could this issue occur, but you can try fixing this error by going to configurations and re-saving AccountPage schema (please also note that in case you have several account edit page schemas (like UsrAccount1Page, UsrAccount2Page and so on)) and you need to re-save content of all those schemas (by clicking on "Save" button at the top left corner of schema editor https://prnt.sc/rdrops). Once done please relogin to the application and try to open edit page once again


Best regards,

Oscar

Oscar Dylan,

I was trying to build it on trial environment. I could not apply the steps you mentioned because it expired by the time.

But thanks for helping.

Ram

Show all comments

Hi everybody,


Is there a way to apply CSS styles for this type of Dashboard?

I want to change the color of the field represented in the screenshot above, but I couldn't find the right methods to do it. Any idea on how to implement this?


Thanks in advance.


Best regards,

Pedro Pinheiro


Like 1

Like

1 comments

Hello Pedro,


Unfortunately, it is not possible to add the custom CSS styles to the dashboards. You can only create the custom widget that will may the  custom CSS styles. More details can be found here https://academy.bpmonline.com/documents/technic-sdk/7-12/adding-custom-dashboard-widget?document=&_ga=2.12020211.678650190.1567427398-650750588.1567427398


We already had similar requests from multiple customers, therefore this possibility will be available in the future application versions only.


Best regards,

Oscar

Show all comments

Hi Community,

Form this post, (https://community.creatio.com/questions/button-section-page-particular-column) I have managed also to put buttons on each record in section page. Now i need also to do the same on LIST type Dashboard. Any idea how can I do this?


Like 0

Like

1 comments

Dear Fulgen, 


I don't have an exact example of how to do it. Here is the way how you can override the dashboard: 

1) Create your custom module that would extend Terrasoft.DashboardListedGridViewModel

Here is an example: 

define("UsrDashboardListedGridViewModel", ["ControlGridModule"], function() {

    Ext.define("Terrasoft.UsrDashboardListedGridViewModel", {

        extend: "Terrasoft.DashboardListedGridViewModel",


        getGridDataColumns: function() {

            var gridDataColumns = this.callParent(arguments);

            gridDataColumns.QualifyStatus = gridDataColumns.QualifyStatus || {path: "QualifyStatus"};

            gridDataColumns.QualificationProcessId =

                    gridDataColumns.QualificationProcessId || {path: "QualificationProcessId"};

            gridDataColumns["QualifyStatus.StageNumber"] =

                    gridDataColumns["QualifyStatus.StageNumber"] || {path: "QualifyStatus.StageNumber"};

            return gridDataColumns;

        },

        getQualifyStatus:function(id) {

            var activeRow;

            if (id) {

                var gridData = this.getGridData();

                activeRow = gridData.get(id);

            } else {

                activeRow = this.getActiveRow();

            }

            if (!activeRow) {

                return null;

            }

            var qualifyStatus = activeRow.get("QualifyStatus");

            return (qualifyStatus) ? qualifyStatus.value : null;

        },

        addColumnLink: function(item) {

            item.getQualifyStatusValue = function(qualifyStatus) {

                if (!qualifyStatus) {

                    return null;

                } else {

                    return {

                        value: qualifyStatus && qualifyStatus.StageNumber || this.get("QualifyStatus.StageNumber"),

                        displayValue: qualifyStatus.displayValue

                    };

                }

            };

            return this.callParent(arguments);

        },

        applyControlConfig: function(control) {

            control.config = {

                className: "Terrasoft.BaseProgressBar",

                value: {

                    "bindTo": "QualifyStatus",

                    "bindConfig": {"converter": "getQualifyStatusValue"}

                },

                width: "158px"

            };

        }

    });

    return {};

});

2) Create your custom module that would extend Terrasoft.DashboardListedGridViewConfig

Example: 

define("UsrDashboardListedGridViewConfig", ["UsrControlGridModule"], function() {

    Ext.define("Terrasoft.UsrDashboardListedGridViewConfig", {

        extend: "Terrasoft.DashboardListedGridViewConfig",


        generate: function() {

            var config = this.callParent(arguments);

            config.items[1].className = "Terrasoft.UsrControlGrid";

            config.items[1].controlColumnName = "QualifyStatus";

            config.items[1].applyControlConfig = { bindTo: "applyControlConfig" };

            return config;

        }


    });

    return {};

});

3) Create you custom module to override Terrasoft.DashboardGridModule: 

define("UsrDashboardGridModule", ["UsrDashboardListedGridViewModel", "UsrDashboardListedGridViewConfig"], function() {


    Ext.define("Terrasoft.configuration.UsrDashboardGridModule", {

        alternateClassName: "Terrasoft.UsrDashboardGridModule",

        override: "Terrasoft.DashboardGridModule",


        viewModelClassName: "Terrasoft.UsrDashboardListedGridViewModel",


        viewConfigClassName: "Terrasoft.UsrDashboardListedGridViewConfig"


    });


});

4) Create your DashboardGridModuleWrapper, which enables UsrDashboardGridModule : 

define("UsrDashboardGridModuleWrapper", ["BaseModule"], function() {


    Ext.define("Terrasoft.configuration.UsrDashboardGridModuleWrapper", {

        extend: "Terrasoft.BaseModule",

        alternateClassName: "Terrasoft.UsrDashboardGridModuleWrapper",


        constructor: function() {

            var parentMethod = this.getParentMethod(this, arguments);

            Terrasoft.require(["DashboardGridModule"], function() {

                Terrasoft.require(["UsrDashboardGridModule"], parentMethod, this);

            }, this);

        }


    });

    return Ext.create("Terrasoft.UsrDashboardGridModuleWrapper");


});

5) Override BootstrapModulesV2 and add DashboardGridModuleWrapper to the dependencies: 

define("BootstrapModulesV2", ["UsrDashboardGridModuleWrapper"], function() {

    return {};

});


You can use this idea to implement the logic from the article you've mentioned to the list dashboard. 

Show all comments

Hello community


I need to build a multi line text using a process.


For example:


Line 1

Line 2

Line 3


How can I add a Line Break to the text ?


Like 0

Like

2 comments

Hello Oren,


I've used this formula value to add this text:


Line 1


Line 2


to "Notes" field of test lead:


"Line1"+ "\r \n"+"Line2"


And as a result I got this http://prntscr.com/rbbkgd


Best regards,

Oscar

Oscar Dylan,

It works !


Thanks Oscar

Show all comments

Inside business process, I've got a task to pick the Account with largest total amount of its Invoices. It can't be performed by simply choosing a field. And making custom field "Total Amount" and updating it on products change seems awkward to me.

Is there a better way?


Like 0

Like

2 comments
Best reply

Dear Yuriy, 


The best option would probably be creating a new field on Account and recalculate it when the new invoice is added. Alternatively, you can loop through all accounts in a process and calculate this number for all of them in a script task, but this wouldn't be an optimal solution. 

Can try reading the invoice object first and then take account id from there and read the account. So while you are reading the invoice, you can sort using the amount.

Dear Yuriy, 


The best option would probably be creating a new field on Account and recalculate it when the new invoice is added. Alternatively, you can loop through all accounts in a process and calculate this number for all of them in a script task, but this wouldn't be an optimal solution. 

Show all comments

Hi Community,


In client code, How i can retrieve the html div id of each row of grid section data?

Like 0

Like

3 comments

Hello Fulgen,


This is an out-of-the box logic of our application so that IDs of elements on the page are generated randomly when refreshing the page. Currently there is no way to modify this logic since it is set in core application schemas and binary files of the application. We already have a problem registered to our R&D team so they could add some extra logic that allows static IDs of elements on the page (since request like that was asked to integrate Creatio application with PRA tools like UiPath).


The only possible way to achieve your task is to use data-item-marker since values there are static and doesn't modify after each refresh of the page. For example data-item-marker for global search window is "command-line".


Best regards,

Oscar

Oscar Dylan,


Thanks Oscar,


I just noticed like in Product Section data item marker is the product name, if there are duplicate product name data item marker will not be unique. Is there a way I can modify the data-item-marker of each row, i will give the guid of the record instead of the name? Please give me example how to do it. Thank you so much

Hello,


It is not possible to modify "data-item-marker" of the edit page (it is being generated) and we don't have a particular example of such an implementation. 


Best regards,

Oscar

Show all comments

we upgraded on on-prem sales creatio to 7.15.2 and now the GlbDataBinding application fails upon installation.

Like 0

Like

3 comments

Dear Kumar,


During the installation process the application is compiled. If the application cannot be compiled due to some errors, not related to the GlbDataBinding tool, the installation process will fail as well. Therefore, please make sure you can compile the application without any errors and after that install the marketplace package.


Regards,

Dean 

Dean Parrett,


I did that and for reason I keep getting this error. Any thoughts?

Kumar,


Try to delete the installed marketplace package, compile the whole system and re-install the GlbDataBinding package again.

That should help.


Regards,

Dean

Show all comments

Hi Community,


How can I override the dashboard list Name link, OOB functionality is opening its  corresponding record but instead of this I want to put some logic and  open other page. Where can I override this exact function? Any idea?


Like 0

Like

1 comments

Dear Fulgen, 


Please see the article below on how to change the logic on the link click: 

https://community.creatio.com/questions/show-captions-instead-absolute-url-links


 Here is the way how you can override the dashboard: 

1) Create your custom module that would extend Terrasoft.DashboardListedGridViewModel

Here is an example: 

define("UsrDashboardListedGridViewModel", ["ControlGridModule"], function() {

    Ext.define("Terrasoft.UsrDashboardListedGridViewModel", {

        extend: "Terrasoft.DashboardListedGridViewModel",


        getGridDataColumns: function() {

            var gridDataColumns = this.callParent(arguments);

            gridDataColumns.QualifyStatus = gridDataColumns.QualifyStatus || {path: "QualifyStatus"};

            gridDataColumns.QualificationProcessId =

                    gridDataColumns.QualificationProcessId || {path: "QualificationProcessId"};

            gridDataColumns["QualifyStatus.StageNumber"] =

                    gridDataColumns["QualifyStatus.StageNumber"] || {path: "QualifyStatus.StageNumber"};

            return gridDataColumns;

        },

        getQualifyStatus:function(id) {

            var activeRow;

            if (id) {

                var gridData = this.getGridData();

                activeRow = gridData.get(id);

            } else {

                activeRow = this.getActiveRow();

            }

            if (!activeRow) {

                return null;

            }

            var qualifyStatus = activeRow.get("QualifyStatus");

            return (qualifyStatus) ? qualifyStatus.value : null;

        },

        addColumnLink: function(item) {

            item.getQualifyStatusValue = function(qualifyStatus) {

                if (!qualifyStatus) {

                    return null;

                } else {

                    return {

                        value: qualifyStatus && qualifyStatus.StageNumber || this.get("QualifyStatus.StageNumber"),

                        displayValue: qualifyStatus.displayValue

                    };

                }

            };

            return this.callParent(arguments);

        },

        applyControlConfig: function(control) {

            control.config = {

                className: "Terrasoft.BaseProgressBar",

                value: {

                    "bindTo": "QualifyStatus",

                    "bindConfig": {"converter": "getQualifyStatusValue"}

                },

                width: "158px"

            };

        }

    });

    return {};

});

2) Create your custom module that would extend Terrasoft.DashboardListedGridViewConfig

Example: 

define("UsrDashboardListedGridViewConfig", ["UsrControlGridModule"], function() {

    Ext.define("Terrasoft.UsrDashboardListedGridViewConfig", {

        extend: "Terrasoft.DashboardListedGridViewConfig",

        generate: function() {

            var config = this.callParent(arguments);

            config.items[1].className = "Terrasoft.UsrControlGrid";

            config.items[1].controlColumnName = "QualifyStatus";

            config.items[1].applyControlConfig = { bindTo: "applyControlConfig" };

            return config;

        }


    });

    return {};

});

3) Create you custom module to override Terrasoft.DashboardGridModule: 

define("UsrDashboardGridModule", ["UsrDashboardListedGridViewModel", "UsrDashboardListedGridViewConfig"], function() {

    Ext.define("Terrasoft.configuration.UsrDashboardGridModule", {

        alternateClassName: "Terrasoft.UsrDashboardGridModule",

        override: "Terrasoft.DashboardGridModule",

        viewModelClassName: "Terrasoft.UsrDashboardListedGridViewModel",

        viewConfigClassName: "Terrasoft.UsrDashboardListedGridViewConfig"

    });

});

4) Create your DashboardGridModuleWrapper, which enables UsrDashboardGridModule : 

define("UsrDashboardGridModuleWrapper", ["BaseModule"], function() {

    Ext.define("Terrasoft.configuration.UsrDashboardGridModuleWrapper", {

        extend: "Terrasoft.BaseModule",

        alternateClassName: "Terrasoft.UsrDashboardGridModuleWrapper",

        constructor: function() {

            var parentMethod = this.getParentMethod(this, arguments);

            Terrasoft.require(["DashboardGridModule"], function() {

                Terrasoft.require(["UsrDashboardGridModule"], parentMethod, this);

            }, this);

        }

    });

    return Ext.create("Terrasoft.UsrDashboardGridModuleWrapper");

});

5) Override BootstrapModulesV2 and add DashboardGridModuleWrapper to the dependencies: 

define("BootstrapModulesV2", ["UsrDashboardGridModuleWrapper"], function() {

    return {};

});


Show all comments

Hi Community,


We have working editable detail grid, now we have added an "Unlimited length text field" into it. How we can configure this field to make it Multi line field in Editable Detail Grid just like its behavior in edit page.

Like 0

Like

2 comments

I remember reading a post or Academy page about it but I have not tried it yet, myself. I want to know how to do this as well. I think they said you can apply custom CSS. Maybe this link can get you in the right direction. Let me know if you succeed. 

https://community.creatio.com/questions/detail-styles-css

Hello,


In your detail schema please add this part of code to "attributes" of your schema:


"UsrStringField": {


                    "contentType": Terrasoft.ContentType.LONG_TEXT

                },


where "UsrStringField" should be replaced with the name of your column in the object that represents your detail.


Once done you need to refresh the page and once you click on the record in your detail with an editable list you will see this https://prnt.sc/retlu3


But as for making this field to be displayed as multi-line text without clocking on the record - it is not possible.


Best regards,

Oscar

Show all comments

We applied custom css on mobile interface successfully; idea took from this article  custom css reflected on all screens (after successful login)


We are using Creatio Mobile Emulator for identifying html/css , we need to apply css on login page (before successful login), once we apply the custom css (using above method) for login page it’s not reflecting, we came to know that all css source files are from local emulator. So, there should be a way to achieve this requirement


There is an html file (Creatio\Creatio_Mobile_Emulator\7.15.7\appV2\MobileApp\LoginPage.html)


We tried to modify this file and changes are successfully reflecting on mobile Emulator. We modified “LoginPage.html” and change showing on mobile emulator like below screenshot but not on mobile app.

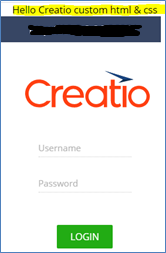
 

The question is how it will be proceed for on-demand development and production systems mobile app?

Can we modify above file on local and send to Creatio Support so that they will configure for our on-demand development and production systems mobile app?

Like 0

Like

1 comments

Unfortunately, it's not possible to modify the Login page for mobile application.

Show all comments