![]()
![]()
Does anyone have implemented a Bar Code Scanner inside Creatio?
Hi Community,
Our customer has requested a bar code scanner inside Creatio, so they can scan products and check its information.
We have multiple ways of doing this:
- WebApp (Custom Component) that opens the smartphone camera;
- WebApp (Custom Component) that establishes a connection to a scanner device (for example a Zebra Scanner);
-
Bar code scanner in the mobile app, which we will be able to configure as described here https://academy.creatio.com/docs/8.x/resources/release-notes/8-2-1-energy-release-notes#title-2782-13.
For our use case, we will be using the first option, since option three is not available at the moment.
After some digging, we discovered that there are multiple libraries that could help us implement this use case. However, we decided to post this question to know if someone has already implemented something similar, or at least tried to. So, we can share the know-how behind it.
Thank you.
Like
Have not tried, also looking forward to some knowhow. Not just to scan, but also to generate for event registrations for example.
I have integrated a barcode scanner with Creatio. We've used a simple bluetooth barcode scanner connected to the device (in our case it was a tablet with full Creatio open in the browser). Most barcode scanners work just like a connected keyboard. When a barcode is scanned it sends the "text" value of the barcode to as input, just as if it were typed in. In my solution, we had a page that opened and we set focus to a text/input field on the page and dislayed some message about "waiting for barcode" for the user. Then, once scanned, the text value of the barcode scanned triggered a change event for the text/input field and we then did the action needed for the barcode (which in our case the barcode was a vehicle VIN, so we then used an API to get the vehicle details for the scanned VIN). All really simple to be honest. Using this approach, thinking of the barcode scanner as text entered by an input device, just like a keyboard, it all turned out to be really easy to work with.
Hope this helps.
Ryan.

Ryan Farley,
Hello, Looks like the barcode scan functionality has been released for Mobile version 8.2.4. Here is what Creatio sent us. Did anyone from community get a chance to try this?
BarcodeScanService is a service used to initiate the barcode scanner and retrieve the scan result using scan() method. Supported barcode types:
- Aztec: ISO/IEC 24778 — 2D matrix barcode, compact, high data capacity, no quiet zone needed.
- Code 39: ISO/IEC 16388 — Variable-length, alphanumeric, widely used in logistics and inventory.
- Code 93: ISO/IEC 15417 — Higher density and reliability version of Code 39, supports more characters.
- EAN: ISO/IEC 15420 — 1D barcode for retail products, encodes 12-13 digits, globally standardized.
- Code 128: ISO/IEC 15417 — High-density 1D barcode, supports ASCII 128, used in shipping and logistics.
- Data Matrix: ISO/IEC 16022 — 2D barcode, supports large data storage, error correction included.
- QR: ISO/IEC 18004 — 2D matrix code, fast scanning, supports URLs, text, and more, error correction built-in.
- ITF (Interleaved 2 of 5): ISO/IEC 16390 — Numeric-only, compact, used for cartons and packaging.
- UPCE: ISO/IEC 15420 — Compressed version of UPC, for small products, 6-digit format.
- PDF417: ISO/IEC 15438 — 2D stacked linear barcode, supports large data, used in documents and IDs.
Return data
type - Indicates the result type: barcode, error, or cancelled.
rawContent - The scanned barcode content; null if the scan is canceled or an error occurs.
errorMessage - Describes the error if an error occurs; null otherwise.
format - Specifies the barcode format (one of the supported types or unknown); null in case of an error.
Usage:
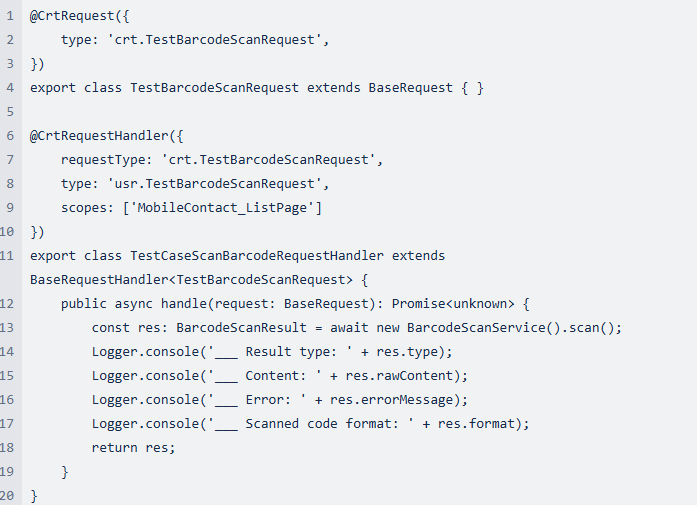
@CrtRequest({
type: 'crt.TestBarcodeScanRequest',
})
export class TestBarcodeScanRequest extends BaseRequest { }
@CrtRequestHandler({
requestType: 'crt.TestBarcodeScanRequest',
type: 'usr.TestBarcodeScanRequest',
scopes: ['MobileContact_ListPage']
})
export class TestCaseScanBarcodeRequestHandler extends BaseRequestHandler<TestBarcodeScanRequest> {
public async handle(request: BaseRequest): Promise<unknown> {
const res: BarcodeScanResult = await new BarcodeScanService().scan();
Logger.console('___ Result type: ' + res.type);
Logger.console('___ Content: ' + res.rawContent);
Logger.console('___ Error: ' + res.errorMessage);
Logger.console('___ Scanned code format: ' + res.format);
return res;
}
}
Hi there, I managed to make working example of QR code or barcode scanning in Creatio mobile application, as well as GPS data reading. The most challenging was to make proper code wrapper for your lines of code. You can find more details about this wrapper here:
Custom request handler for mobile app
Here is my example of index.ts file:
/* Import the required functionality from the libraries. */
import {
    BaseRequest,
    CrtRequest,
    BaseRequestHandler,
    CrtRequestHandler,
    Logger,
    CrtModule,
    bootstrapCrtModule,
    DoBootstrap,

    BarcodeScanService,
    BarcodeScanResult,

    GeolocationService,
    GeolocationServicePosition,
    GeolocationAccuracy
} from "@creatio/mobile-common";


/* Add the "CrtRequest" decorator to the "SomeRequestNameRequest" class. */
@CrtRequest({
    type: 'usr.SomeRequestNameRequest'
})

export class SomeRequestNameRequest extends BaseRequest {}

/* Add the "CrtRequestHandler" decorator to the "SomeRequestNameHandler" class. */
@CrtRequestHandler({
    requestType: 'usr.SomeRequestNameRequest',
    type: 'usr.SomeRequestNameHandler',
    scopes: ['MobileFUIContactRecordPageSettingsDefaultWorkplace'],
})

export class SomeRequestNameHandler extends BaseRequestHandler<SomeRequestNameRequest> {

    public async handle(request: SomeRequestNameRequest): Promise<unknown> {

        /* Implement a custom business logic to process scanned data. */
        // this is just an example of how you can read column value at mobile FreedomUI form page
        let name = await request.$context['Name'];
        // note: you must add BarcodeScanService and BarcodeScanResult in your import code section
        const res: BarcodeScanResult = await new BarcodeScanService().scan();
        // set result value in Name column of Contact Form mobile FreedomUI Page, just visible proof of concept
        request.$context['Name'] = 'Scanned text: ' + res.rawContent;

        // note: you must add GeolocationService, GeolocationServicePosition and GeolocationAccuracy in your import code section
        const coords: GeolocationServicePosition = await new GeolocationService().getCurrentCoordinates(GeolocationAccuracy.low);
        // set resut values in Contact Form mobile FreedomUI Page, another visible proof of concept
        request.$context['Dear'] = "GPS coords: Lat:" + coords.latitude + ", long:" + coords.longitude;
        // visible proof that code successfully reaches this line
        request.$context['JobTitle'] = "GPS works!";
        return this.next?.handle(request);
    }
}

// It seems that this part is necessary to make this module work as JS source in File Content part of your Creatio package
@CrtModule({
    /* Specify that "SomeRequestNameHandler" is request handler. */
    requestHandlers: [
        SomeRequestNameHandler
    ]
})

export class SomeMainAppClass implements DoBootstrap {
    bootstrap(): void {
        bootstrapCrtModule('SomeMainAppClass', SomeMainAppClass);
    }
}
After running command npm run build in my TypeScript project folder I got .\out\mobile\DevModule\main.js file and manually copied it to my Creatio package file content destination: .\Terrasoft.WebApp\Terrasoft.Configuration\Pkg\UsrMyDemo\Files\src\mobile\SomeMainAppClass\main.js
This example is designed to be used with a Button added to Contact Form Page (FreedomUI) in Creatio mobile application. I set
usr.SomeRequestNameRequestas request name for my custom button. Here is code of my MobileFUIContactRecordPageSettingsDefaultWorkplace module:
[
	{
		"operation": "merge",
		"name": "settings",
		"values": {
			"localizableStrings": {
				"primaryColumnSetContact_caption": "Primary column set",
				"profileColumnSetContact_caption": "Profile",
				"infoColumnSetContact_caption": "Contact info",
				"ContactCareerDetailV2EmbeddedDetailContact_caption": "Job experience",
				"ContactAddressDetailV2EmbeddedDetailContact_caption": "Addresses",
				"ContactCommunicationDetailEmbeddedDetailContact_caption": "Communication options",
				"ContactTimelineTab_caption": "Timeline",
				"TabFeed_caption": "Feed",
				"TabAttachments_caption": "Attachments"
			},

            "entitySchemaName": "Contacts",
            "settingsType": "RecordPage",
            "columnSets": [],
            "operation": "insert",
            "details": [],
            "viewConfigDiff": "[{\"operation\":\"insert\",\"name\":\"SomeButton\",\"parentName\":\"Contact_PrimaryTab_Body_profileColumnSet\",\"propertyName\":\"items\",\"values\":{\"type\":\"crt.Button\",\"caption\":\"Button\",\"clicked\":{\"request\":\"usr.SomeRequestNameRequest\"}}}]"


 		}
	}

]
I am using Creatio 8.3.0.3074 and Creatio Mobile 8.3.4 for Android. I installed current version of Customer360 app into my Creatio system.
When I open any Contact in mobile app, click on my new Button, this code starts one-time barcode scanning and sets results into contact Name. Then code starts reading GPS coordinates and sets results into "Recipient's name" column.
I hope this code sample will help you to build your own Creatio Mobile customization to read QR codes or barcodes or to get GPS coordinates.