I want to create this function where the deadline of my tasks for my sales process, I want it to follow the working days & working hours that I have set-up using calendars. 

However, when I checked initially it doesn't by default use the working days/working hours that I set up in calendars. Its instead just taking calendar days.

Does anyone know how I can create maybe a business process to these two requirements: 

  1. When creating a task deadline, the system calculates the end date factoring the holidays setup in calendars. For example the task has a SLA/deadline to be completed in 5 days and the task was created this Monday. But this Tuesday its a holiday in the calendar, so the deadline for this task is not set for Friday but instead the following Monday. 
     
  2. When tracking total task duration can this track the setup working hours in calendar? Because right now when the partner tries this, its counting the entire 24 hour day instead of the 8 working hour that has been set-up.
     

If anyone knows or has experience with setting up the business process would appreciate it

Like 0

Like

1 comments

Hi,

By default, task deadlines in Creatio are calculated using calendar time (24/7), which means the system does not automatically exclude weekends, holidays, or non-working hours defined in user calendars. Because of this, SLA deadlines and task duration may not always reflect actual working schedules.

One possible approach to address both of your requirements (excluding holidays from deadlines and tracking duration based on working hours) is to implement a small customization using a business process.

Conceptually, the solution works as follows:

Instead of calculating the deadline using a single continuous task that spans across calendar time, we introduce a structure where one main task represents the overall activity, while the system automatically creates smaller “child” tasks that follow the user’s working calendar.

Step 1 – Main task creation
When the main task is created (for example with an SLA of 5 working days), the business process is triggered. This task represents the overall work item that users interact with.

Step 2 – Reading the user’s working calendar
The process retrieves the calendar configuration of the assigned user, including:

  • working days
  • working hours
  • holidays and non-working days

This ensures that the calculation is based on the actual working schedule rather than standard calendar days.

Step 3 – Calculating working time slots
The process then calculates the available working time starting from the task creation time. It skips:

  • weekends
  • holidays
  • non-working hours

For example:
If the task is created on Monday and Tuesday is configured as a holiday, the process will skip Tuesday when calculating the SLA.

Step 4 – Creating child tasks for working periods
Instead of keeping one long task that spans 24 hours a day, the system automatically creates several smaller “child” tasks. Each child task represents a specific working period (for example one working day or a defined number of working hours).

These child tasks:

  • reference the main task through a lookup field (e.g., “Parent Task”)
  • have start and end times strictly within working hours
  • represent actual planned working intervals.

Step 5 – Calculating the final deadline
The deadline of the main task is then set to the end date of the last generated child task.

This means the system effectively calculates the SLA based on real working time. If a holiday occurs during the period, the deadline automatically shifts to the next available working day.

How this solves both requirements

  1. Deadline calculation excluding holidays
    Because the process only schedules work during valid working days and hours, holidays and weekends are automatically skipped when determining the final deadline.
  2. Tracking task duration based on working hours
    Instead of measuring the duration between task creation and completion (which counts the full 24-hour day), the system can track duration based on the combined working intervals represented by the child tasks. This provides a much more accurate view of actual working time.


Show all comments
campaign
audience
referrals
Studio_Creatio_enterprise_edition
8.0

Hello, I am building a campaign flow, and need to find a way to trigger an email to refrees' on referral accounts. So the break down is, a referral comes in through a webform, the referral will have the contact and account that referred them in the system. once the referral become an active account i need an email to trigger to the contact that referred them in the first place. How do i set up an email to trigger to that referral

Like 0

Like

1 comments

Hi!

To achieve this in Creatio, you need to set up a campaign or a business process that triggers an email to the contact who referred the new account once the referral becomes active. 

Below is a high-level overview of how to configure this in Creatio via BP.

 1. Verify the Relationship - Make sure the referral Account has a lookup field to the Contact who referred them (e.g., “Referred by”).
This contact must have a valid email address.

 2. Create a Business Process:

Start signal: Record modified

Object: Account

Condition: Status = Active
(Recommended: trigger only when the Status field changes to avoid duplicate emails)

 3. Add Send Email Element

Add Send Email element with parameter: Recipient → Account → Referred by (Contact) → Email

When the Account status changes to Active, the system automatically sends an email to the Contact who referred that account.

If needed, this can also be implemented via Campaigns. You would need to build a new campaign where contacts are added once the related account  (e.g., “Referred by”) moves to a specific stage that indicates it is ready for sending communications.

Show all comments
json
collection
subprocess
Studio_Creatio_enterprise_edition
8.0

Hi all,

I am running a process to deserialise a JSON string from a webhook and pass the results (an email address and a state) into a sub process.

The deserialisation step works as I can see the results which have been passed into the collection of records parameter in the process log (only 1 in this sample):
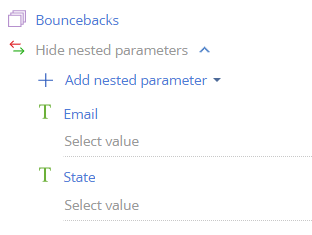
Collection parameter

Parent process
                {
            "Parameter": "Bouncebacks",
            "Value": {
                "Before execution": [
                    {
                        "email": "billy.bob@river.com",
                        "__state__": "bounced"
                    }
                ],
                "After execution": [
                    {
                        "email": "billy.bob@river.com",
                        "__state__": "bounced"
                    }
                ]
            }
        }

  I pass this collection into a sub-process but the values don't appear to pass in correctly:
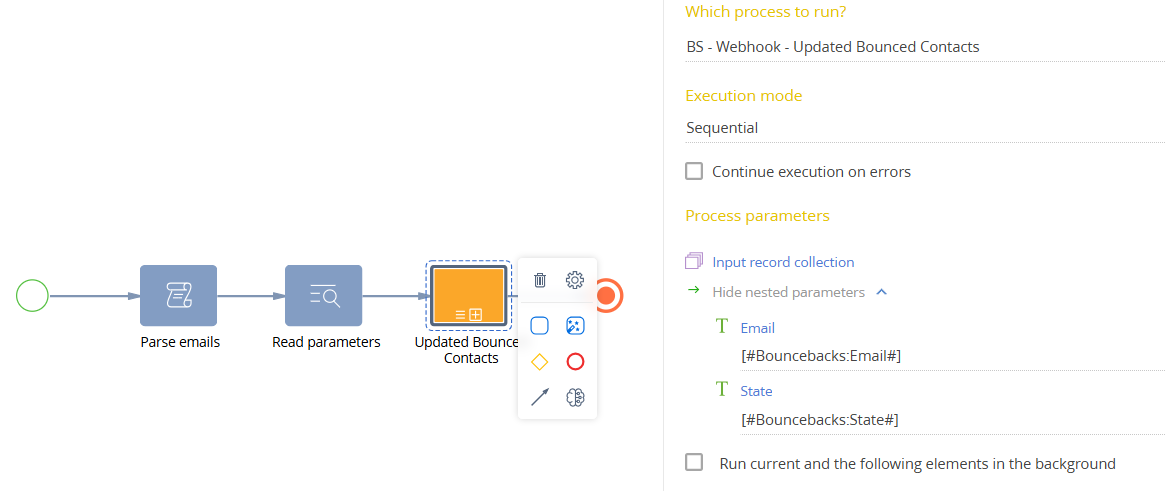
Parent process

//Sub process
        "Process parameters": [
        {
            "Parameter": "Email",
            "Value": {
                "Before execution": null,
                "After execution": null
            }
        },
        {
            "Parameter": "State",
            "Value": {
                "Before execution": null,
                "After execution": null
            }
        }
    ]      

  I cannot figure out why not. Any ideas?      

Like 0

Like

2 comments
Best reply

Hi Cris, you can pass parameters to the process and execute it directly from the script element where you're parsing JSON like this:

UserConnection userConnection = Get<UserConnection>("UserConnection");
IProcessEngine processEngine = userConnection.IProcessEngine;
IProcessExecutor processExecutor = processEngine.ProcessExecutor;
var nameValues = new Dictionary<string, string>();
nameValues["Parameter1"] = someValue1.ToString();
nameValues["Parameter2"] = someValue2.ToString();
processExecutor.Execute("UsrProcessName", nameValues);

this line 

processExecutor.Execute("UsrProcessName", nameValues);

will always execute the latest active version of the process. So if you create new version of the UsrProcessName it will be run without need to update the script. Naturally this code should be included into your original cycle where the parsing itself is performed.

Hello.

Passing parameter values of collection types is not supported for compiled process schemas. 
Therefore, to resolve this, it is recommended to create a new process schema.
The diagram contains task elements that include source code, so the code logic should be moved into a source-code schema. Then, in the business process schema, create an instance of that class and call its methods.

Best regards,
Antonii.

Hi Cris, you can pass parameters to the process and execute it directly from the script element where you're parsing JSON like this:

UserConnection userConnection = Get<UserConnection>("UserConnection");
IProcessEngine processEngine = userConnection.IProcessEngine;
IProcessExecutor processExecutor = processEngine.ProcessExecutor;
var nameValues = new Dictionary<string, string>();
nameValues["Parameter1"] = someValue1.ToString();
nameValues["Parameter2"] = someValue2.ToString();
processExecutor.Execute("UsrProcessName", nameValues);

this line 

processExecutor.Execute("UsrProcessName", nameValues);

will always execute the latest active version of the process. So if you create new version of the UsrProcessName it will be run without need to update the script. Naturally this code should be included into your original cycle where the parsing itself is performed.

Show all comments
ExcelReportBuilder
excel
ExcelExport
Studio_Creatio_enterprise_edition
8.0

Hi.  We are using the Excel add-in to create a spreadsheet and attach it to an email.

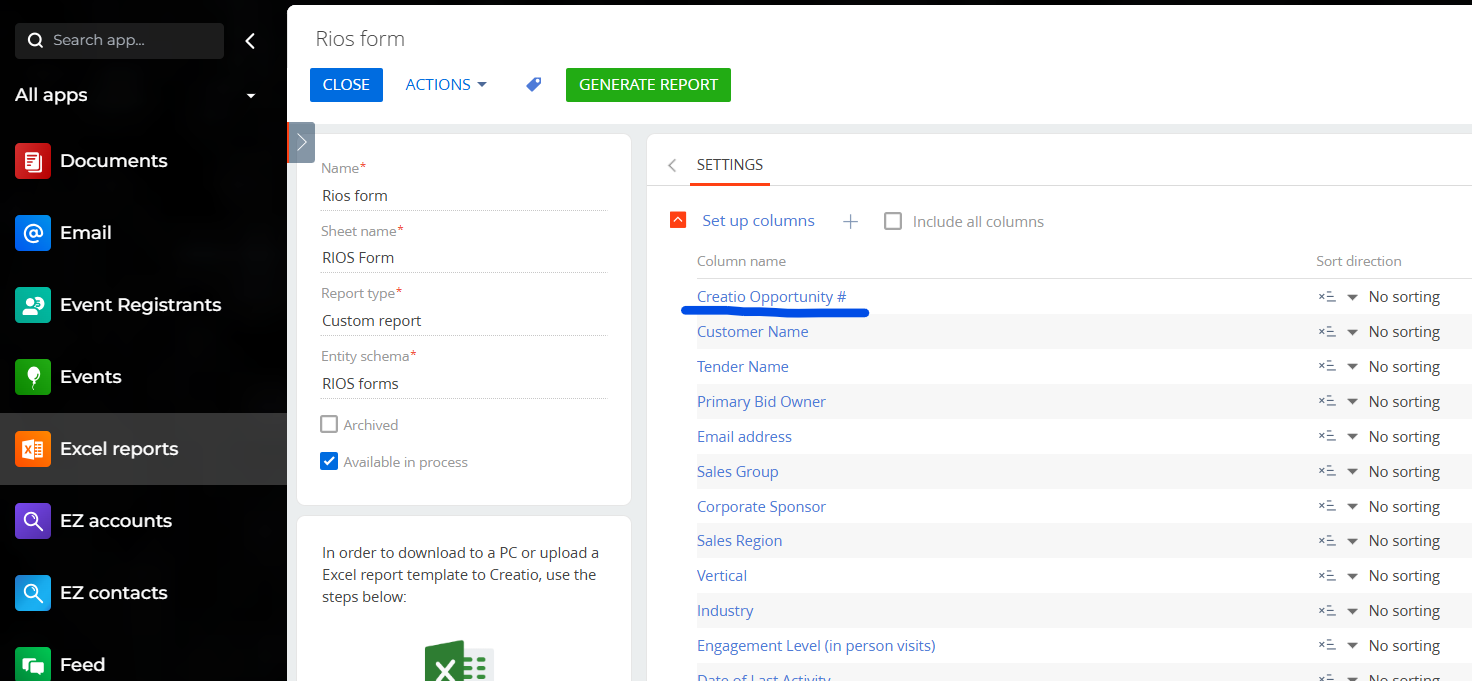
Is there any way to create a link in a cell?  We have the Opportunity # listed in the spreadhseet, and it would be handy if the user could just click the cell and open that Opportunity in Creatio directly.

I know I can open Excel and create a hyperlink like Oppy-123456 but can this be created in the Excel add-in somehow?

Thanks
Rob


Like 1

Like

2 comments

You could likely add a formula using the Excel HYPERLINK function in the template for the Excel report. 

Essentially, create a template for the Excel report. In the Excel report you'd have a column for the record Id. Then use that Id in the formula to create the hyperlink. You could hide the column for the Id as well. If you've not created a template for an Excel report before I have some info here.

Ryan

Thanks -- that's a helpful video!  I will give all this a try and post my results here.
~~~ rob

Show all comments
landingpage
Studio_Creatio_enterprise_edition
8.0

For a customer, we have a custom object UsrCandidate which is initially populated from an external system.
At that point, we already know the candidate’s full name and email address.

We want to send the candidate an email with a Marketing Landing Page link, where they can complete additional information (via a web form).

Our challenge is the following:

  • When the candidate submits the landing page, Creatio creates a new UsrCandidate record
  • We want the submission to update the existing UsrCandidate record instead, so that there is only one record per candidate

Is there a supported way to:

  • Pass the existing Candidate record ID (or another identifier) into the landing page (e.g. via URL parameters), and
  • Configure the landing page so that it updates the existing record instead of creating a new one?

If possible, we would prefer a Creatio-native approach (Marketing landing pages, matching logic, hidden fields, etc.), rather than post-submission merging via a business process.

Any guidance or best practices would be much appreciated.

Thanks in advance!

Like 20

Like

1 comments

You can’t do it directly from a landing page, but it is still possible to work. If you included the ID of the record, you want to update in either a hidden field on the landing page or in the URL you could   page submit to a staging  Then a process could take the data from the staging object and update the appropriate record based on the ID in the data. 

Show all comments
Studio_Creatio_enterprise_edition

Hi there

I have a custom field called Start Date on my screen for Contact. All I want to do is to prevent users to be able to enter dates that are before 2026.  The Start Date must be any dates in or after 2026.

I thought it would be a simple requirement that would have a no-code solution.  Can you be kind enough to let me know if it's possible?  I just cannot get that to work.  

Thank you

Like 4

Like

4 comments

Hello,

At this time, the behavior of the date picker itself cannot be adjusted using standard no-code or low-code tools in Creatio. The calendar interface does not currently support restricting or disabling specific date ranges, such as dates before 2026.

As a result, preventing users from selecting dates prior to 2026 directly in the calendar would require custom development. 

Hi Andrii

Thank you for your answer.  I'm not really just talking about date field, I'm talking about validation in general.  For example, date must be 2026 or after; or user must enter either FieldA or FieldB; or text that should be between 5 to 10 characters, etc.  
 

My question therefore is, if Creatio has a way to configure edits to make sure no bad data gets saved.

Thank you


+1, validators aren't very nice currently in Creatio, with fairly fiddly code modifications. Being able to apply them in a no-code way would be very useful. And being able to add new globally-available validators in a low-code/easy way would also be helpful.

Thank you Harvey, exactly!  I have been writing some blog posts about creating a Creatio app with no-code, and I'm really stuck here, because I was assuming there would be easy, simple, no-code way to do data validation before a record gets saved.  But without using validator, I haven't found an elegant way.  I tried using the process designer with pre-configured page, but it's really lacking in terms of UX.

Show all comments
FreedomUI
tabs manipulation
tabs
Studio_Creatio_enterprise_edition
8.0

Hi all,

I'm hoping to remove the indent from the tabs element so that it lines up with the parent element without the indent.

Example with indent

Example without indent

Would I apply it changes to the tab object or the individual tabs?

  • Tabs
    • TabPanel_Allocation
      • TabContainer_Roundtables
Like 0

Like

2 comments
Best reply

Hello,
By the look of your request, you need to change the CSS padding option.
You can do it by adding a custom CSS script to your page, example here https://customerfx.com/article/adding-custom-css-style-sheets-in-bpmonline/

Hello,
By the look of your request, you need to change the CSS padding option.
You can do it by adding a custom CSS script to your page, example here https://customerfx.com/article/adding-custom-css-style-sheets-in-bpmonline/

Thanks Dmytro, I've managed to do this by updating the page directly through the console. I'll try my hand with the CSS script today

Show all comments
data
Export Data
sql
Studio_Creatio_enterprise_edition
8.0

Hi All,
I have to export data from Creatio. the largest table has 1.1 million records and obviously 150 K records that have attachments and objects in rich text control (Notes and attachments).
I am hoping you may point me in the right direction if you have or encounter such a need.
Thank you in advance.

Like 0

Like

4 comments
Best reply

Greetings,

Unfortunately, it is currently not possible to export records from the Attachments detail using the bulk export function. Please be assured that our R&D team is aware of this limitation and is already working on implementing such functionality in future system releases.

Regarding the bulk export of records, let us provide a bit more detail on how the export process works. Records are exported in batches, and the size of each batch is determined by the system setting “ExcelExportBatchSize.”
For example, if you export 100,000 records and the system setting “ExcelExportBatchSize” is set to 10,000, the system will export 10 batches of 10,000 records each. In the end, you will receive one file containing all 100,000 records, so there is no difference for the end user.

Also, you can add a new system setting with code "ExportToExcelTimeout" to control the amount of time the system will try to complete the Excel request. This system setting should be created in the "System settings" section, with the following configuration: The time specified is in milliseconds. We recommend setting the value to 30 minutes (1,800,000 milliseconds), and if this is not enough increase slightly. Please note that system settings can only be created from system administrator user or Supervisor. 

Hope this helps.

Have a nice day!

Greetings,

Unfortunately, it is currently not possible to export records from the Attachments detail using the bulk export function. Please be assured that our R&D team is aware of this limitation and is already working on implementing such functionality in future system releases.

Regarding the bulk export of records, let us provide a bit more detail on how the export process works. Records are exported in batches, and the size of each batch is determined by the system setting “ExcelExportBatchSize.”
For example, if you export 100,000 records and the system setting “ExcelExportBatchSize” is set to 10,000, the system will export 10 batches of 10,000 records each. In the end, you will receive one file containing all 100,000 records, so there is no difference for the end user.

Also, you can add a new system setting with code "ExportToExcelTimeout" to control the amount of time the system will try to complete the Excel request. This system setting should be created in the "System settings" section, with the following configuration: The time specified is in milliseconds. We recommend setting the value to 30 minutes (1,800,000 milliseconds), and if this is not enough increase slightly. Please note that system settings can only be created from system administrator user or Supervisor. 

Hope this helps.

Have a nice day!

Hi Daria, Thank you I have made the changes suggested.
Can I please clarify when you say bulk export of record, you mean the Actions menu commnad "Export to Excel" in a section?

Greetings,

Yes, you are correct. We meant the export of the selected records from the list page, for example, or the actions menu command you mentioned.

Thank you, I have added the time setting but works for 20,000 records but it times out if more records.
I have the transaction table with 1,106,000 records
Any suggestions?


Show all comments
Studio_Creatio_enterprise_edition
8.0

Hi all, is there a No-Code way to prevent Users navigating to a record in a List?
I appreciate we can lock down editability of list.  It is the behaviour to navigate to a record we want to block.  

Currently a User can either click into the row or use the 3 vertical dots on the left of a Row to navigate to a specific record page.


Thanks.

Like 0

Like

2 comments

Hello Raoul, 

To my knowledge this can only be disabled for single Lookup Fields by changing a parameter ("showValueAsLink"), but I don't think such functionality is provided for Lists OOTB.

The two workarounds described below might be helpful to you, as they describe possible solutions to both of your mentioned scenarios:

Disable Hyperlink on Primary Key field of Lookup. | Community Creatio

How Disable option to delete & copy records in a Section in Freedom UI | Community Creatio

Kind regards,
David
 

Thank you David, while these links do not directly answer the question, does give some clues.  Through a combination of using CSS to disable the row clickability, and a comment from Ryan Farley (special shout out again) for mentioning idea of override the Action options (the 3 vertical dots at the left of the row).
We'll use these clues as a starting guide...

Cheers, Raoul.

Show all comments
FreedomUI
list
selection
Studio_Creatio_enterprise_edition
8.0

Hi Community,

We have a list of records, and we want to execute a process that receives a list of the IDs of the selected records.

Currently, this logic works as expected when we select a few records, for example, if we select two records, we receive the IDs of those two records.

However, when we select all records, the process does not receive any IDs. After reviewing how the list of IDs is generated, we noticed that when all records are selected, the logic is reversed: only the unselected records have their IDs included in the list.

Is there a way to always retrieve the IDs of the selected records, even when all records are selected?

Thank you.

Best Regards,

Pedro Pinheiro

Like 0

Like

2 comments
Best reply

Hi Community,

I've managed to solve this requirement by following the solution described by Harvey Adcock in the post Getting & Acting on Multi‑select Records in Creatio Freedom UI | Community Creatio.

Basically, the approach involves extracting the filter from the grid detail and using it in a separate query on the same object to retrieve the record IDs.

Best Regards,

Pedro Pinheiro

Retrieving the selected property only works with the loaded records, and records are only loaded in pages of 30 records at a time - so you won't get all. 

Instead of retrieving the selected property, you could instead bind to the list's data source and use a collection param in the process to receive the result? See here for no code approach: https://customerfx.com/article/launching-a-process-for-multiple-records…

Or via code, include the following in your request to crt.RunBusinessProcessRequest (make sure your datasource name is PDS or change below, also that the List is named DataTable, or change below). Note: in my process I have a collection parameter named "Accounts" with a single unique identifier property named "AccountId": 

"dataSourceName": "PDS",
"parameterMappings": {
    "Accounts.AccountId": "Id"
},
"filters": "$Items | crt.ToCollectionFilters : 'Items' : $DataTable_SelectionState | crt.SkipIfSelectionEmpty : $DataTable_SelectionState",
"sorting": "$ItemsSorting",
"selectionStateAttributeName": "DataTable_SelectionState"

Hi Community,

I've managed to solve this requirement by following the solution described by Harvey Adcock in the post Getting & Acting on Multi‑select Records in Creatio Freedom UI | Community Creatio.

Basically, the approach involves extracting the filter from the grid detail and using it in a separate query on the same object to retrieve the record IDs.

Best Regards,

Pedro Pinheiro

Show all comments